Announcement

Collapse
No announcement yet.

What's the best way to repair a cracked coil?

Collapse
X
 
  • Filter
  • Time
  • Show
Clear All
new posts

  • What's the best way to repair a cracked coil?

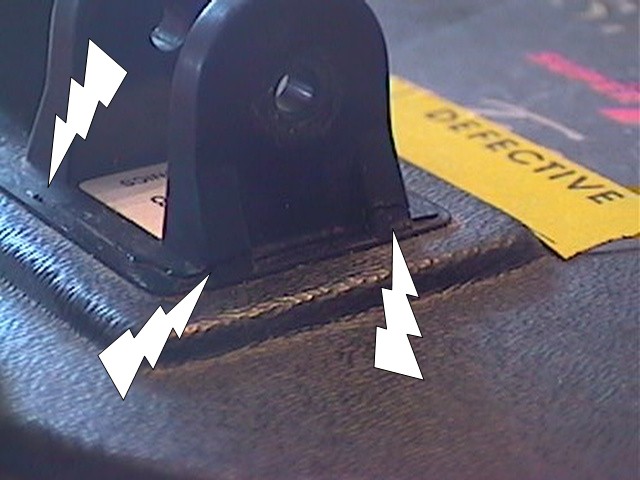
    Let's just say a coil cracks where the rod gets connected to it. Not completely broken off, just cracked. I guess we could call the part, "ears". What would be the best way to fix it? If it's possible.

    Super Glue?

    JB-Weld?

    Other epoxies?

    What about if the coil has a cover, the kind that you can't see the epoxy that is used to seal the actual coil, and it has a crack in the middle, like if someone stepped on it? How would this one be fixed?

    Going back to the "ears", the coils I have seen, have the "ears" attached to a small square. The square is part of the coil. That square is lifted in a crack. That is the type of crack I am talking about.

    Thanks for any replies.

  • #2
    Re: What's the best way to repair a cracked coil?

    the polystyrene is good glued by butyl acetate, ethyl acetate and dichloroethyl ether. itself. same issolvents/solvents for paints consists of them (you can add same amount of acetylene to it, for a strengthening). a decision may be also to take new L-type "ears" and clue them on new place.

    yours

    PS.
    Super Glue? - no.
    JB-Weld? - no.
    Other epoxies? - no.

    Comment


    • #3
      Re: What's the best way to repair a cracked coil?


      Hi E.J.

      KT is correct, the best way to fix a coil is to use the proper bonding of materials.

      Now, many of the manufacturers use ABS plastic for their coil housings. If this is the case, then you can do a repair job using another piece of ABS and a slurry of dissolved ABS as a glue.

      You should be able to do the same if the coil housing is made of styrene also.

      IF the ears are totally bad, then it might be easier to remove what remains and install a new set. I have found they can be made by bending a piece of ABS into a U shape or use angles and simply glue them in place.

      The glue to be used will be ABS plastic dissolved in MEK. If enough ABS is used, the mixture will be a thick slurry type liquid that makes a great glue. Put this on the pieces to be glued together so there is an ample amount on each and stick the two pieces together and let dry completely. When done, the bonding is more of a weld and is almost as strong as the original material. If you can't find MEK, then acetone can be used.

      If just one ear is bad, then you might try reinforcing it with a piece of the proper plastic bonded to the ear using the slurry mentioned above.

      Now, I have attached a pic of the basic design of the bracket I have used in the past.

      Reg

      Comment


      • #4
        Here is a pic of the crack....


        As you can see, it's only a crack. It still seems to be a strong as I didn't notice it till I really looked.

        What I have done so far is melt tie-wraps and basically welded the cracks. It looks not too good, but it aint bad either.

        The next step is to get MEK and try to "smooth" it out.

        Thanks for the input.

        Comment


        • #5
          Another part opf the CRACK

          Comment


          • #6
            Re: Another part opf the CRACK

            Hi E. J.

            I loaned a Gold Bug 2 to a friend which he used for quite some time. When I finally felt it was time to get it back, I found out that he has slammed a trunk lid down on the coil, creating a bunch of cracks in the housing.

            As a solution, I simply made up a fair amount of "slurry" made by dissolving diced ABS plastic pieces in the MEK. I took this slurry and simply painted a coat over the surface. In a few cases I had to go back and add a second layer.

            When done, the housing was sealed again.

            Now, when building coils while using one of Bill Hay's coil housings, I will take some of the extra ABS plastic Bill usually sends with the housing and dissolve it in some MEK. This slurry is then sucked up in a plastic syringe and then applied to the crack where the two halves of the housing meet. The crack is effectively sealed this way and the two halves of the housing are firmly attached to each other. The down side of using a syringe is the air pockets that can get in them. This makes it difficult to get a nice even flow.

            If I am in a hurry or can't use a syringe because I am out of them, I will simply dab the slurry on the gap between the two housings using a small paintbrush. With a little care, it works almost as well. This would probably be the method I would use to try to fill the cracks in the housing you have.


            Reg

            Comment


            • #7
              Re: Another part opf the CRACK

              Excellent information!

              This was what I was gonna do. I will just make a small batch of melted plastic and dab it in place, then sand it down to look mor "natural".

              I will take pix of the process and post them in another thread.

              Thanks for the help.

              ejf

              Comment

              Working...
              X