
 Tweet
Tweet
For those interested in DIY will show you how to make a coil pulse . Lightweight, rugged, durable and practical.
would not tell you about spirals and inductance but a different method of construction with new materials.
after wrap the coil and make and shield-for those who want to shield-cut a piece of wood, thin as the thickness of the coil. in mine construction used plywood 9mm. dimensions of 10 cm x 20. On the one hand cut the shape of the perimeter of the coil. It will be like half moon . wood you will need to secure the coil in spades. This wood is put through the coil and secures it with a makeshift PAPER TAPE.
with one or with two notches in the middle of the wood, place two vertical timber which will become the mainstay of the coil in which the arm screwed  Which brings us to the exotic materials .to wrap the coil utilizes a synthetic strip.It is called '' casting tape''-so said or plaster and'' yellow'' or synthetic plaster

It's a film that I find in stores with medical store -not in pharmacies, unless you make your order and bring-and used by orthopedic splinting in leg or arm instead classic plaster.
 bagging is airtight packed and dry out after a few minutes by touching the air . I found the 3M but there are others on the market.
COST = 8 EURO bagging if I remember correctly.
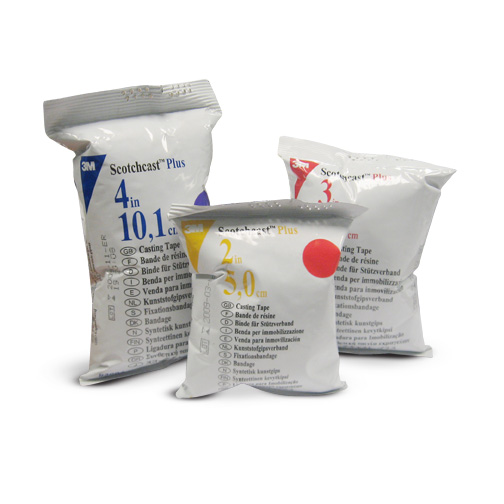 . Dimensions are 5 and 10 cm X 3.6 meters. enough for one reel. wraps it around the log, along with pieces of wood to catch three successive pleated at least.when he finished soaking with water,with a sponge and wait a few minutes. when dry gives a casing around the coil is lightweight, very strong and rigid and can be sanded and dyes ... or stay as it was. I at the end of the passage and with a little Epoxy Resins in the places wood finishes for durability. the light is pinion 40 cm but I have made to 60. I hope the photo to help to understand what I say.
, for those who tried NEEDED gloves when handling the film.
for more info in my blog
http://palmosdetect.blogspot.gr/2013/08/blog-post.html
IS IN GREEK LANGUAGE. PLEASE USE A TRANSLATOR
would not tell you about spirals and inductance but a different method of construction with new materials.
after wrap the coil and make and shield-for those who want to shield-cut a piece of wood, thin as the thickness of the coil. in mine construction used plywood 9mm. dimensions of 10 cm x 20. On the one hand cut the shape of the perimeter of the coil. It will be like half moon . wood you will need to secure the coil in spades. This wood is put through the coil and secures it with a makeshift PAPER TAPE.
with one or with two notches in the middle of the wood, place two vertical timber which will become the mainstay of the coil in which the arm screwed
COST = 8 EURO bagging if I remember correctly.
, for those who tried NEEDED gloves when handling the film.
for more info in my blog
http://palmosdetect.blogspot.gr/2013/08/blog-post.html
IS IN GREEK LANGUAGE. PLEASE USE A TRANSLATOR
Comment